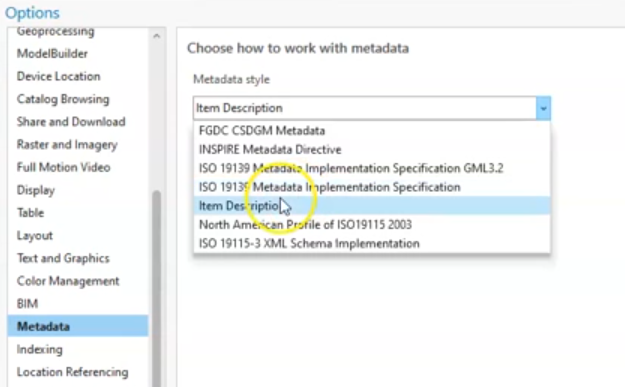
Retrieving and Sharing Data
ESRI uses metadata from map services to provide information about the data.
share your data
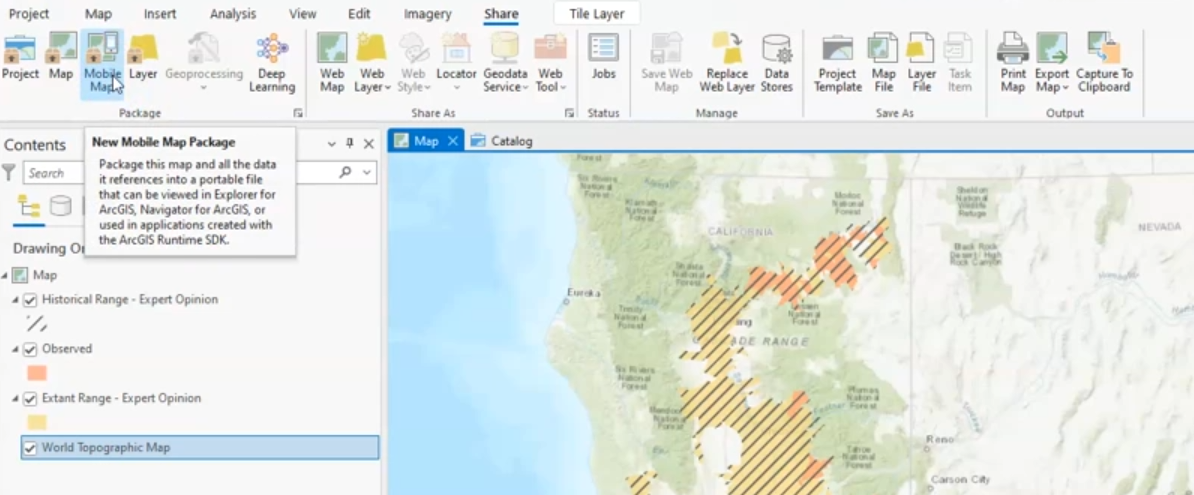
package your map

import map package 📦
assets/2025-01-26-15-41-43.png
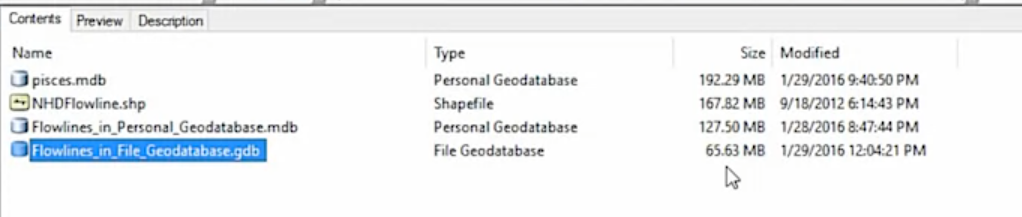
File and data formats 📁
- Shapefiles: Use for simple projects or when compatibility with other GIS software is required.
- Personal Geodatabases: Use for small to medium projects, especially when integration with Microsoft Access is needed.
- File Geodatabases: Use for large datasets, complex projects, and modern workflows due to their superior performance and flexibility.
| Feature | Shapefile | Personal Geodatabase | File Geodatabase |
|---|---|---|---|
| File Format | Multiple files (e.g., .SHP, .DBF, .PRJ, etc.) | Single file (.MDB) | Folder containing multiple files (managed by ArcGIS) |
| Storage Technology | Old database technology | Based on Microsoft Access (old storage technology) | Modern storage technology |
| Data Types Supported | Vector only (points, lines, polygons) | Vector, raster, tables, and Esri-specific data types | Vector, raster, tables, and Esri-specific data types |
| Number of Feature Classes | Single feature class per shapefile | Multiple feature classes | Multiple feature classes |
| File Size Limit | 2GB per component file | 2GB for the entire database | Virtually unlimited (limited by disk space) |
| Field Name Limit | 13 characters | 64 characters | 64 characters |
| Compression | No compression | Greater compression than shapefiles | Highest compression among the three |
| Performance | Slower for large datasets | Faster than shapefiles | Fastest for large datasets |
| Compatibility | Widely supported across GIS software | Compatible with Microsoft Access | Requires ArcGIS or compatible software |
| Ease of Sharing | Requires zipping multiple files | Single file, easy to share | Requires zipping the folder |
| Use Case | Simple projects, widely supported format | Small to medium projects, integration with Microsoft Access | Large datasets, complex projects, modern workflows |
| Metadata Support | Limited | Better than shapefiles | Best metadata support |
| Raster Data Support | Not supported | Supported | Supported |
| Editing and Querying | Limited | Advanced (via Microsoft Access) | Advanced (via ArcGIS) |
joins and relates
assets/2025-01-26-15-58-55.png
assets/2025-01-26-15-59-45.png
https://www.coursera.org/learn/gis/lecture/u0Axq/joins-and-relates
assets/2025-01-26-16-01-58.png
Key Points:
-
Joins and Relates in GIS:
- Joins: Combine tables by adding columns from one table to another based on a common ID column.
- Relates: Establish a connection between two tables to pass selections or summarize information without physically merging the tables.
-
Tables and Data Sources:
- Tables can be attribute tables associated with feature classes, independent tables (e.g., CSV files), or tables within a file geodatabase.
- Joins and relates are used to connect different data sources for analysis or symbology in GIS.
-
Common ID Column:
- Both joins and relies on a common ID column to link tables.
- The ID column names do not need to be identical but must contain matching values.
-
One-to-Many Relationships:
- Relates are particularly useful for one-to-many relationships, where one record in a table corresponds to multiple records in another table (e.g., one zone with multiple observations).
-
Practical Applications:
- Joins: Useful for adding additional attributes to a feature class (e.g., adding drainage area data to rivers).
- Relates: Useful for summarizing or analyzing related data (e.g., linking watersheds to species observations).
Steps for Joins and Relates in ArcGIS Pro:
Joins:
- Identify Common ID:
- Ensure both tables have a common ID column with matching values.
- Add Join:
- Right-click the target layer (e.g., rivers) > Joins and Relates > Add Join.
- Select the input table (e.g., cumulative area table) and the common ID column.
- Validate Join:
- Use the validate tool to check for one-to-one or one-to-many matches.
- Review Results:
- Open the attribute table to verify the joined columns.
- Use Select by Attributes to check for unmatched records.
Relates:
- Identify Common ID:
- Identify the common ID column between the two tables (e.g., HUC 12 and Zone ID).
- Add Relate:
- Right-click the target layer (e.g., subwatersheds) > Joins and Relates > Add Relate.
- Set the input and output fields, and define the relationship (e.g., one-to-many).
- Use Relate:
- Select features in the primary table (e.g., subwatersheds).
- Use the Related Data option to view corresponding records in the related table (e.g., species observations).
Exercises:
-
Join Exercise:
- Load a feature class (e.g., rivers) and a CSV file with additional attributes (e.g., drainage area).
- Perform a join to add the drainage area data to the rivers attribute table.
- Validate the join and check for unmatched records.
-
Relate Exercise:
- Load a feature class (e.g., watersheds) and a table with observations (e.g., species data).
- Establish a relate between the watersheds and observations using a common ID.
- Select watersheds and use the relate to view corresponding observations.
-
Data Analysis:
- Use joined data to create symbology (e.g., color-code rivers by drainage area).
- Use relates to summarize observations within selected watersheds.
-
Error Checking:
- Practice identifying and resolving issues with joins and relates (e.g., mismatched IDs, null values).
Summary:
- Joins physically combine tables by adding columns.
- Relates create a dynamic connection between tables for analysis.
- Both rely on a common ID column and are essential for managing and analyzing spatial and tabular data in GIS.